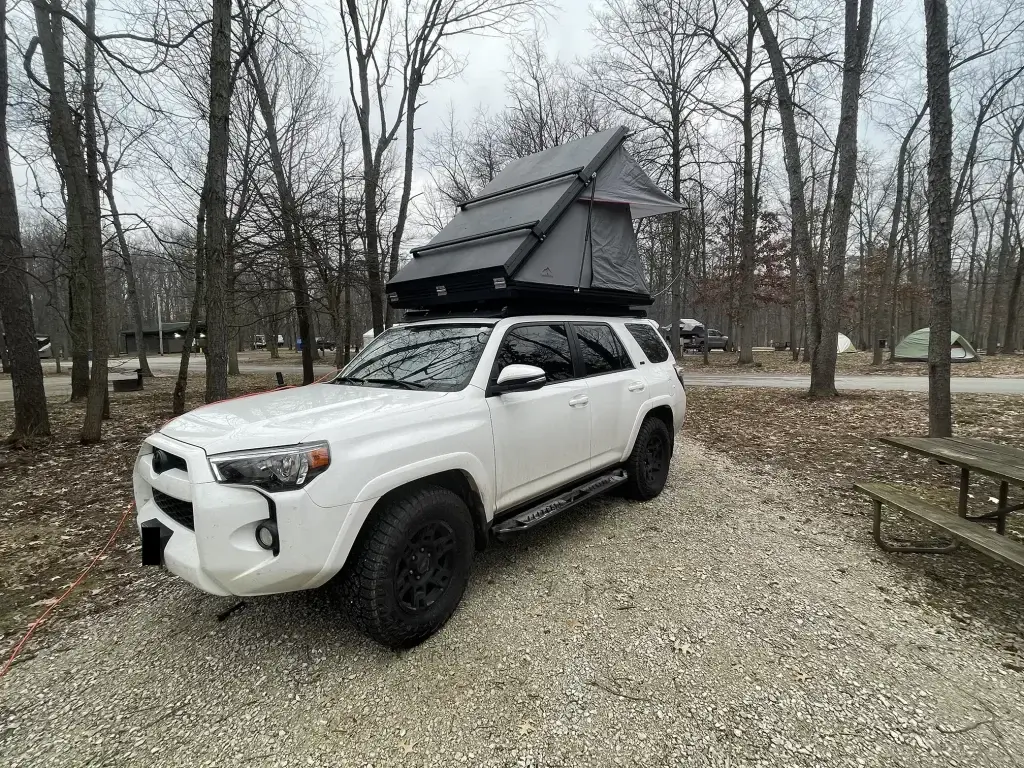
Overlanding rigs look impressive on social media. The rooftop tent, the gear mounted to the outside, the whole setup. What those posts rarely show is the research that should go into understanding your vehicle’s roof rack weight limit before any of that gear goes up there. Strapping hundreds of pounds to a roof without knowing what the rails and rack can actually handle is a safety problem that does not announce itself until something goes wrong.
I learned this when moving from my Jeep Wrangler to the 4Runner. What I found changed how I approached the entire build.
Roof Rack Weight Limits: What You Need to Know
Most people buying a rooftop tent or a roof basket focus on the product weight and call it done. The problem is that the weight rating on the gear is only half the equation. The other half is what your vehicle’s roof rails or rack can actually support, and that number is almost always lower than people assume, especially when the vehicle is moving.
When I researched the factory roof rails on the 4Runner, I discovered that manufacturers provide suggested weight limits but often will not commit to exact numbers. I also learned that there are two entirely different limits to understand: static and dynamic.
Static vs Dynamic Roof Rack Weight Limits
Static Weight Limit
The static weight limit is the maximum weight the roof rails or rack can support while the vehicle is stationary. This is the number most people find when they look up their vehicle’s roof capacity, and it is the higher of the two figures. It applies when you are loading gear, setting up camp, or climbing in and out of a rooftop tent while parked.
Dynamic Weight Limit
The dynamic weight limit is the maximum weight the roof rails or rack can support while the vehicle is in motion. This number is significantly lower than the static limit because of the forces acting on the vehicle and everything attached to it when driving. Wind resistance, acceleration, braking, cornering, and road vibration all add stress to the mounting points that simply does not exist when the vehicle is standing still.
This is the number that matters most for safety, and it is the one that gets overlooked most often.
Every vehicle is different, and every product from the factory or the aftermarket has its own ratings. Read the owner’s manual. Read the product documentation. Do not assume that because something fits it is rated for the load you want to put on it.
A news story was circulating at the time I was doing this research about an improperly secured kayak that flew off a vehicle on the highway and struck a motorcyclist. A completely preventable accident. It is the kind of thing that is easy to dismiss as someone else’s problem until you think about what your own roof is carrying at 70 miles per hour.
From Factory Rails to an Aftermarket Rack
On the Jeep Wrangler, I used an external exoskeleton that let me mount gear and the rooftop tent without modifying the vehicle itself. That setup worked well for the Jeep but did not translate to the 4Runner.

When I looked at whether the factory roof rails on the 4Runner could handle the rooftop tent I already owned, I found the tent weight was slightly over the factory limit. There are aftermarket crossbars available that are rated higher than the factory units and would have been a reasonable solution for lighter loads like a roof basket or cargo carrier. But for a rooftop tent, something that gets climbed in and out of, that catches wind on the highway, that takes constant vibration on rough roads, I wanted something over-engineered rather than something that technically could work.
The decision was to replace the factory rails entirely with a dedicated aftermarket roof rack. After researching options based on load ratings, reviews, fitment, and budget, I went with a Prinsu no-drill rack for the 4Runner. The no-drill option was important to me since I did not want to put holes in the truck body. It mounts to the factory mounting points and the difference in rated capacity compared to the factory rails was significant.

Installation Notes and What I Learned
Getting the rooftop tent mounted to the Prinsu rack was a process. The tent covers most of the rack surface, which left very little clearance when getting bolts into position. Long wrenches are essential for reaching fasteners in tight spaces, something I did not fully appreciate until I was in the middle of the installation. Plan for more time than you think it will take and have the right tools before you start.
The finished setup is solid and I have confidence in it at highway speeds in a way I would not have had with the factory rails carrying the same load. That peace of mind is worth whatever the upgrade costs.
What to Do Before You Buy
If you are planning to add a roof rack, rooftop tent, or any significant gear to your vehicle’s roof, the process should go in this order: find the static and dynamic weight limits for your factory roof rails in your owner’s manual, weigh the gear you plan to carry, compare those numbers honestly, and then decide whether an upgrade is necessary before you spend money on the gear itself.
If you are not adding much weight and your use is mostly light cargo, upgraded crossbars may be all you need. If you are putting a rooftop tent up there that will be used regularly, do the research on aftermarket rack options for your specific vehicle and choose something rated comfortably above your actual load rather than right at the limit.
For more on building out an adventure rig, check out the 4Runner overlanding setup post, read up on determining your vehicle’s max payload, or browse the Adventure Rig Tips archive for more.
If you want more practical rig tips like this one, the Adventure Rig Tips section has more. The Overlanding Gear section has the specific equipment used on real trips if you want to see what actually gets mounted and why. The newsletter is where I share the extra stuff: rig updates, finds, and things that do not always make it to the blog. Subscribe on Substack if you want to follow along.